Are you eager to experience the latest MacOS Ventura on your Windows PC? With the power of VMware and a few simple steps, you can have MacOS Ventura up and running smoothly in no time. In this guide, we’ll walk you through the process, step by step.
Step 1: Download and Install macOS Unlocker
The first step on your MacOS Ventura journey is to download macOS Unlocker. After downloading, extract the zip file and run ‘win-install’ as an administrator. This tool is essential for unlocking MacOS on VMware.

Step 2: Create a New Virtual Machine
- Open VMware and select “Create a New Virtual Machine.”
- Choose the “Custom” option to have more control over the settings.
- Under “Installer disc image,” select the MacOS Ventura ISO file you’ve obtained.
- On the next screen, select “Apple Mac OS X” as the guest operating system.
- Allocate resources such as RAM, processor cores, and storage based on your system’s capabilities and your needs.


Step 3: Modify VM Configuration
Before powering on your virtual machine, there’s a small configuration tweak to ensure a smoother experience.
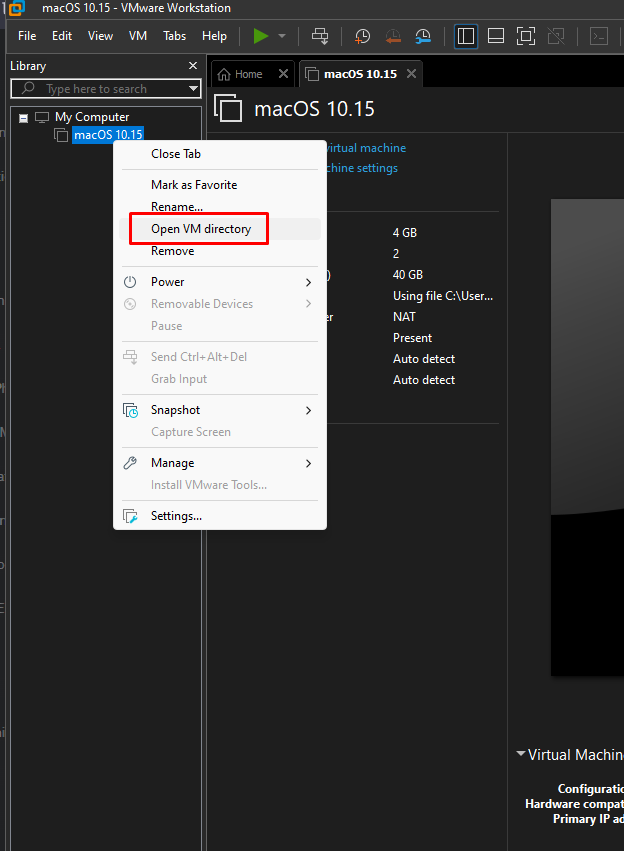
- Right-click on your virtual machine and select “Open VM directory.”
- Locate the “macOS 10.15.vmx” file and open it with Notepad.
- Find the line that says “ethernet0.virtualDev = “e1000e” and replace it with “ethernet0.virtualDev = “vmxnet3”. Save the file.


Step 4: Start the Virtual Machine
Now it’s time to start your virtual machine.
- Run the virtual machine you’ve just created.
- When prompted, select your preferred language.
- Choose the “Disk Utility” option.
- In Disk Utility, select the VMware virtual SATA hard disk and erase it using the default options.
- Quit Disk Utility and select the “Install MacOS 13” option.
- Choose the available drive for installation and proceed.
Step 5: Completing the Installation
After about 30-40 minutes, the MacOS Ventura installation will be complete, and the operating system will boot up. You can now set up your MacOS Ventura environment according to your preferences.
For more information on optimizing graphic acceleration for your virtual machine, be sure to check out our video tutorial, linked below.
With these straightforward steps, you’ll have MacOS Ventura running smoothly on your Windows PC using VMware. Enjoy exploring the latest features and functionalities of MacOS Ventura without the need for a dedicated Mac device. Happy computing!
All the links here
Vmware – https://www.vmware.com/in/products/workstation-pro.html
Vmware keys – https://gist.github.com/PurpleVibe32/30a802c3c8ec902e1487024cdea26251
Vmware Unlocker – https://github.com/paolo-projects/unlocker
MacOS Ventura iso – here
Video Tutorial – https://www.youtube.com/watch?v=oR-W1eCPU_s


