Apple’s iOS beta versions offer exciting new features and improvements, but they can also come with bugs and compatibility issues. If you find yourself facing difficulties with the iOS 17/16 beta and prefer to return to the stable iOS 16.5 release, this article will guide you through the process. Please note that reverting from a beta version to a stable release involves erasing your device and restoring it to factory settings, so it’s crucial to back up your data beforehand.
Step 1: Backup Your Device
Before downgrading, it is essential to create a complete backup of your device. This will ensure that all your data, settings, apps, and media are safe and can be restored after the process is complete. You can back up your iOS device using iCloud or iTunes. Here’s how:
iCloud Backup:
- Connect your device to a stable Wi-Fi network.
- Go to “Settings” on your device, tap on your Apple ID, and select “iCloud.”
- Scroll down and tap on “iCloud Backup.”
- Tap on “Back Up Now” and wait for the backup process to complete.
iTunes Backup:
- Connect your device to your computer and launch iTunes.
- Select your device from the iTunes interface.
- Under the “Summary” tab, click on “Back Up Now” to initiate the backup process.
Important Notice: After thorough testing, we have discovered that it is not possible to restore iOS 17 backups on devices running iOS 16.X. However, there’s good news! You can still retrieve your photos and messages by using iCloud backup.
Step 2: Download and install iTunes ( for Windows users, Mac users don’t have to download any additional tools )
- Open your Windows Marketplace app.
- Search for “iTunes” in the search bar.
- Locate the iTunes app from the search results.
- Click on the app to open its details page.
- Look for the “Install” or “Get” button and click on it.
- Follow the on-screen prompts to complete the installation process.
Once the installation is complete, you will have iTunes installed on your Windows device.
Step 3: Enter Recovery Mode (For iPhone 8 and later models)
- Power off/ Shut down your iPhone ( hold volume up + power and select shutdown option )
- Quickly press and release the Volume Up button.
- Quickly press and release the Volume Down button.
- Connect iPhone to Mac or PC, then press and hold Volume down + Side/ Power button until the Recovery Mode screen appears.
Step 4: Restore your Device to iOS 16.5
For Windows: Once your device is in Recovery Mode, iTunes will prompt you to restore or update your device. Select the restore option, it will download the firmware and restore it on your device.

For MacOS: Once your device is in Recovery Mode, under location find your iPhone, you will get options to restore or update. Select restore, it will download the firmware and restore it on your device.

Step 5: Restore your Backup
After the restoration process is complete, your device will restart with iOS 16.5. Follow the on-screen instructions to set up your device as new. When prompted, choose to restore your device from the backup you created in Step 1.
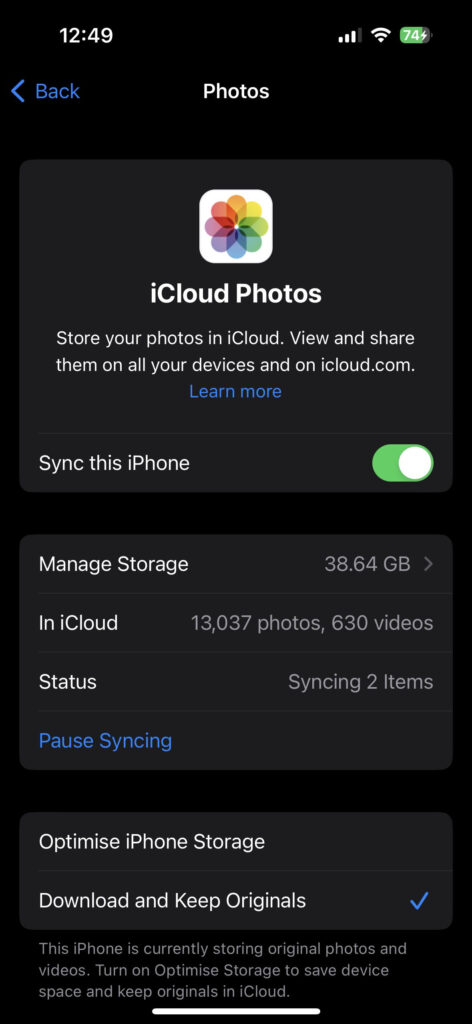
If you have switched back from the iOS 17 beta, follow these steps to restore Photos.
- Go to Settings.
- Tap on iCloud.
- Select Photos.
- Enable “Sync this iPhone.”
- If needed, repeat the same process for Messages.
By doing this, you’ll ensure that your photos and messages are synced properly on your device.


Conclusion:
Reverting from iOS 17/16 beta to stable iOS 16.5 allows you to regain stability and compatibility on your device. By following the step-by-step guide outlined above, you can safely downgrade your iOS version while preserving your data through a backup. Remember to exercise caution, follow the instructions carefully, and ensure you have a reliable backup


